

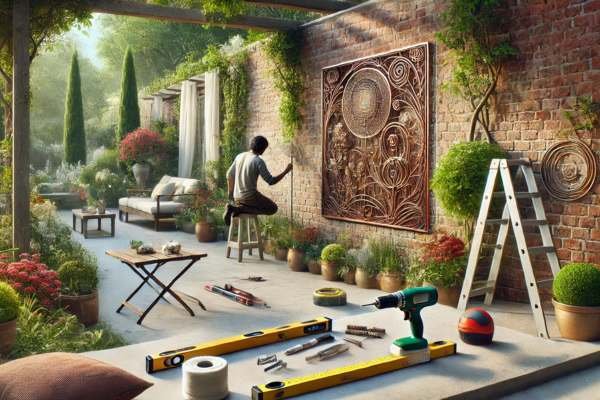
Hanging metal wall art can elevate your home décor with a modern touch. But how do you hang metal wall art securely and stylishly? First, assess your wall type drywall, brick, or plaster since it affects the tools you’ll need. Use a level to ensure perfect alignment and mark where to place hooks or anchors. For heavy pieces, opt for sturdy hardware like toggle bolts or wall anchors. Lightweight art can hang on simple nails or adhesive hooks. Remember to keep the design centered and at eye level for the best aesthetic impact. Whether it’s abstract, floral, or geometric, metal wall art transforms any space into a personalized gallery. Start today and showcase your unique style!
Understanding Different Styles And Designs Of Metal Wall Art
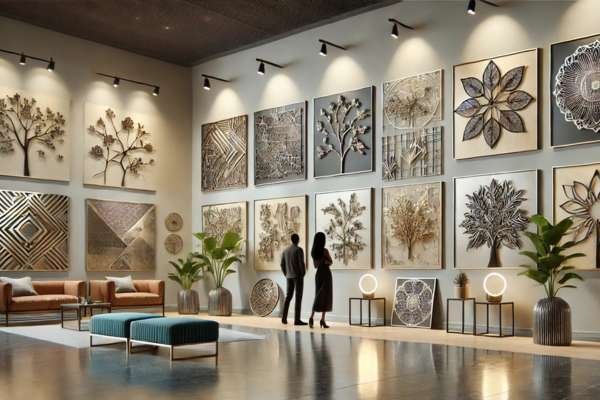
Metal wall art spans a kaleidoscope of styles, each with its unique allure. Some pieces are intricate, featuring delicate filigree patterns that mimic the complexity of lacework. Others exude rustic charm, crafted from wrought iron with earthy textures and tones. Meanwhile, contemporary styles lean toward sleek geometric shapes or avant-garde designs that challenge traditional norms.
For those drawn to nature, metal art depicting floral arrangements, birds, or sprawling vines can harmonize beautifully with an outdoor space. Conversely, abstract forms add an air of mystery, drawing the eye and sparking conversation. Understanding these nuances isn’t just about picking what looks good; it’s about finding a design that resonates with your garden’s essence and your personal taste.
Choosing The Right Metal Wall Art For Your Garden
Your garden is an extension of your home, a canvas waiting to be adorned. When selecting size art for wall art for this space, consider the interplay of colors, textures, and existing décor. A verdant garden with earthy hues might pair splendidly with weathered copper or bronze, their tones blending seamlessly into the natural surroundings. Conversely, gardens with modern hardscaping might call for sleek, stainless steel or matte black designs to maintain a contemporary edge.
Size is another critical factor. A grandiose sculpture might dominate a sprawling garden, creating a bold statement, while smaller, more intimate pieces are better suited to cozy nooks. Above all, choose a piece that feels like an extension of your garden’s soul—something that speaks to you every time you step outside.
Tools And Materials You’ll Need
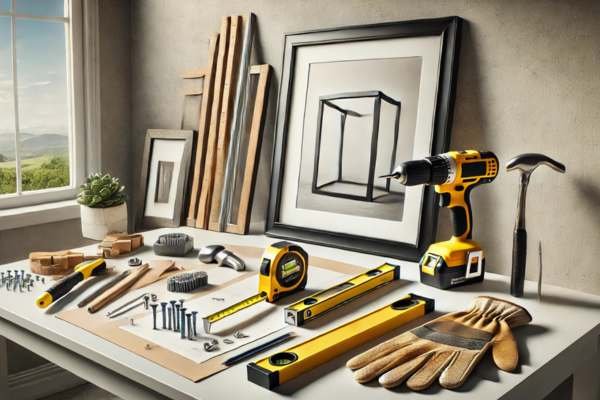
Before embarking on your installation, arm yourself with the right tools. A smooth process hinges on preparation, and here’s what you’ll need:
- Measuring tape: Precision is key to symmetry.
- Level: To avoid the dreaded crooked installation.
- Drill or screwdriver: Depending on your wall type and hardware.
- Anchors and screws: Essential for heavy pieces.
- Adhesive hooks: A non-invasive solution for lighter art.
- Cleaning cloths: For prepping surfaces.
- Safety gear: Gloves and goggles for accident-free work.
These tools are your allies in transforming a vision into reality, ensuring every step of the process is seamless.
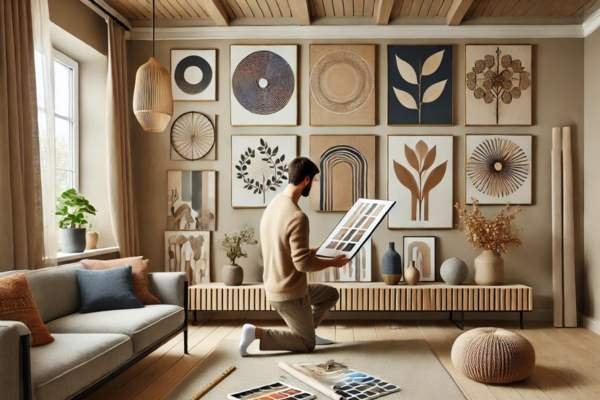
Considering Sizes And Shapes For Your Outdoor Space
When it comes to size and shape, balance is everything. A sprawling rectangular piece might create a powerful focal point on a wide wall, while circular or asymmetrical designs can add softness and fluidity. The trick lies in complementing the space without overwhelming it.
Create mock-ups using paper templates to visualize the final effect. Play around with layouts and proportions, ensuring the art integrates harmoniously with the surrounding elements. This preparatory step is often overlooked but can save you from second-guessing after the installation.
Preparing Your Garden Wall For Metal Art
A well-prepared surface is the cornerstone of a successful installation. Start by scrubbing away dirt, moss, or flaking paint that might impede adhesion or stability. For wooden surfaces, inspect for signs of rot; a compromised wall won’t support even the lightest art.
Concrete or brick walls may require drilling and anchors, but these materials offer unparalleled strength. If your walls has been freshly painted, exercise patience—let it cure fully before proceeding. Preparation is tedious but vital for longevity and a polished appearance.
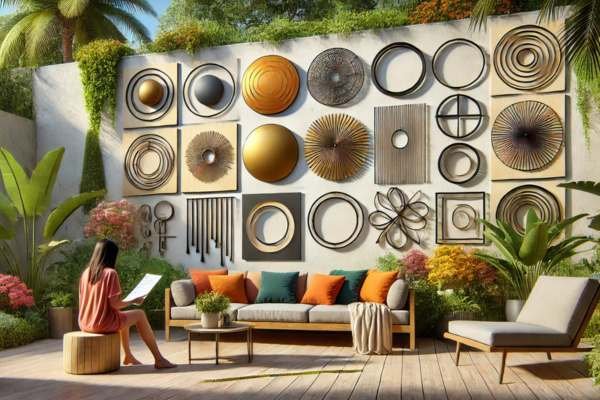
Selecting The Ideal Wall Or Surface In Your Garden
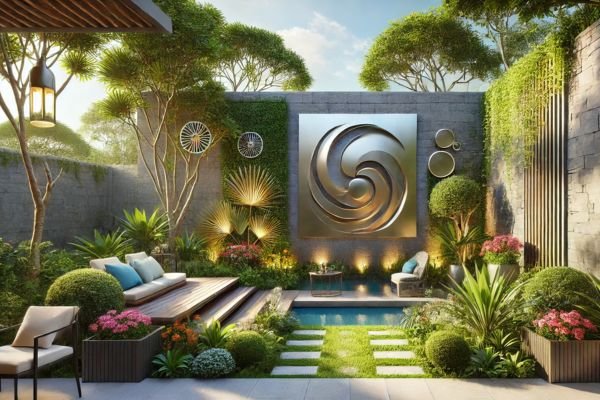
Not all walls are equal when it comes to showcasing art. A central garden wall can serve as the pièce de résistance, drawing attention and setting the tone. Alternatively, smaller walls or secluded corners can create delightful surprises, inviting exploration.
Consider visibility and durability. A wall that receives ample sunlight might alter the metal’s finish over time, while one exposed to heavy rain might demand rust-resistant materials. Your choice of walls is as much about practicality as it is about aesthetics.
Choosing The Right Hanging Hardware For Metal Art
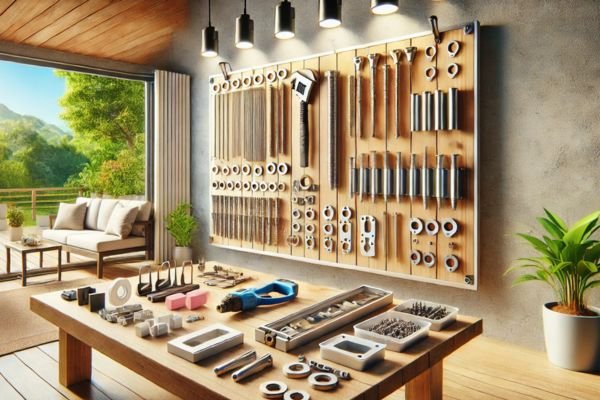
The right hardware ensures your art remains steadfast through the seasons. Lightweight artsy thrives with adhesive hooks or magnetic mounts, offering a damage-free solution. Heavier pieces demand heavy-duty anchors, screws, or brackets. Stainless steel hardware is a must for outdoor settings, resisting corrosion and ensuring durability.
Weight capacity is paramount. Overloading weak hardware invites disaster, so err on the side of caution and invest in quality.
Planning The Placement Of Your Metal Wall Art

Placement is an art form in itself. Consider eye-level positioning for easy viewing or experiment with unconventional placements for a dynamic look. Grouping smaller pieces can create a gallery wall effect, while standalone sculptures shine as solo acts.
Lighting also plays a pivotal role. Soft uplighting or dramatic spotlights can accentuate details, casting enchanting shadows that transform your garden at night.
Using Adhesive Hooks For Lightweight Metal Art
Adhesive hooks are a boon for renters or those wary of drills. They offer simplicity and flexibility, adhering firmly to smooth surfaces without leaving marks. However, their strength is limited—use them only for lightweight art, and follow the manufacturer’s instructions to the letter.
Special Techniques For Uneven Or Textured Walls
Textured walls present a unique challenge. Masonry screws are indispensable for brick or stone, providing a firm grip. For extreme textures, consider mounting a flat panel first, creating a smooth foundation for your art. This dual-layered approach combines functionality with an added design element.
Hanging Metal Wall Art Without Damage
Protecting your walls doesn’t mean compromising on style. Use non-invasive techniques like adhesive strips or magnetic mounts whenever possible. For heavy pieces, opt for discrete anchors that minimize visible damage. Always test the placement before committing—measure twice, drill once.
Creating Visual Impact With Metal Wall Art
Metal wall art isn’t just an accessory; it’s a statement. Layer it with complementary décor, like cascading vines or framed mirrors, for added depth. Thoughtful lighting can bring metal to life, highlighting textures and creating mesmerizing shadows.
Common Mistakes To Avoid When Hanging Metal Wall Art
Avoid rushing. Misjudged measurements, inadequate hardware, or poorly prepared surfaces can lead to disaster. Take the time to plan meticulously, double-checking every detail. Quality always trumps speed.
FAQs
– Can Metal Wall Art Be Hung Without Drilling?
Yes, you can hang metal wall art without drilling by using adhesive hooks, strong double-sided tape, or removable mounting strips. These options work best for lightweight pieces and smooth surfaces. Ensure the wall is clean and dry before application for a secure hold. For heavier pieces, drilling may still be necessary.
– What’s the Best Way to Hang Metal Wall Art?
The best way to hang metal wall art is by using wall anchors, screws, or hooks, depending on the weight and size. Locate wall studs for heavier art and use a level to ensure proper alignment. For a clean, damage-free option, use adhesive strips for lighter pieces.
– How Do I Safely Hang Heavy Metal Wall Art?
To safely hang heavy metal wall artsy, locate walls studs using a stud finder and secure it with screws or heavy-duty anchors. Use a level to ensure straight positioning and distribute the weight evenly across multiple anchors if necessary.
Conclusion
Hanging metal wall art is a simple yet impactful way to enhance your space. Start by choosing the ideal location and ensure proper alignment. Use appropriate tools like screws, anchors, or adhesive hooks based on the weight of the piece. For heavier artwork, locate wall studs for added support. Lightly mark the position before installation to achieve a perfect look. Secure the art carefully to prevent damage and ensure stability. With thoughtful placement and sturdy installation, your metal wall art will transform your room, adding style and personality while creating a captivating visual centerpiece.